Quickstart
This document lists the minimal steps to install or build FLAME GPU 2, create a new model and run a simulation.
Details are provided for both the C++ and Python 3 interfaces, however first you should review the following prerequisites section.
Prerequisites
Regardless of which programming interface you wish to use there are some common requirements:
Windows or Linux
CUDA Toolkit
>= 12.0and a Compute Capability>= 5.0NVIDIA GPUFLAME GPU aims to support the 2 most recent major CUDA versions, currently
12and13.On Windows, CUDA
>= 12.4is required for some optional features (python support)
Installing python binary wheels requires:
Python
>= 3.8pipglibc>= 2.28(linux)
Building C++ from source:
CMake
>= 3.25.2C++20 capable C++ compiler (host), compatible with the installed CUDA version
Microsoft Visual Studio 2022 (Windows)
If you wish to build python bindings from source you will also require:
swig
>= 4.1.0Swig
4.xwill be automatically downloaded by CMake if not available (if possible)Swig
4.2.0is incompatible with FLAME GPU.
C++
Installation
The C++ interface is not currently available as a pre-built binary distribution, or configured for central installation at this time.
Please refer to Creating a New Project section.
Creating a New Project
The simplest way to create a new project is to use the provided template repository on GitHub:
https://github.com/FLAMEGPU/FLAMEGPU2-example-template
This includes a CMakeLists.txt file, which sets a binary target named example, which depends on the core FLAMEGPU/FLAMEGPU2 repository, and will build it from source if required.
You can either:
Use GitHubs’s
Use this templatefeature to create a copy of the template repository on your accountDownload a copy of the template repository as a zip via
Download zipClone the template repository via
git clone git@github.com:FLAMEGPU/FLAMEGPU2-example-template.git
See the template project’s README.md for more information related to using and customising this template.
Compiling Your Project
FLAME GPU 2 projects using the C++ interface use CMake with out-of-source builds. This is a 3 step process:
Create a build directory for an out of tree build
Configure CMake into the build directory, using the CMake CLI or GUI
Customise any CMake configuration options, such as the CUDA compute capabilities to target
Build compilation targets using the configured build system
For example, to build the example target of the template repository, for Compute Capability 6.0 GPUs in the Release configuration, using 8 threads:
mkdir -p build && cd build
cmake .. -DCMAKE_CUDA_ARCHITECTURES=75 -DCMAKE_BUILD_TYPE=Release
cmake --build . --target example -j 8
mkdir build && cd build
cmake .. -G "Visual Studio 17 2022" -DCMAKE_CUDA_ARCHITECTURES=75
cmake --build . --target example --config Release -j 8
For more information on CMake Configuration options please see the template repository README.md as these options may vary between releases.
Note
On windows, by default CMake will select the newest version of CUDA available when configuring. If you have multiple versions of CUDA installed then you can select an earlier installed CUDA version (e.g. CUDA 12.0) by additionally passing -T cuda=12.0 when calling CMake configure (cmake ..).
It is still necessary for the selected version of CUDA to be supported by FLAME GPU.
The relevant CMake documentation can be found here.
CMake GUI (Windows Only)
However, CMake also provides cmake-gui on Windows, a CMake client with a graphical interface which may be preferable.
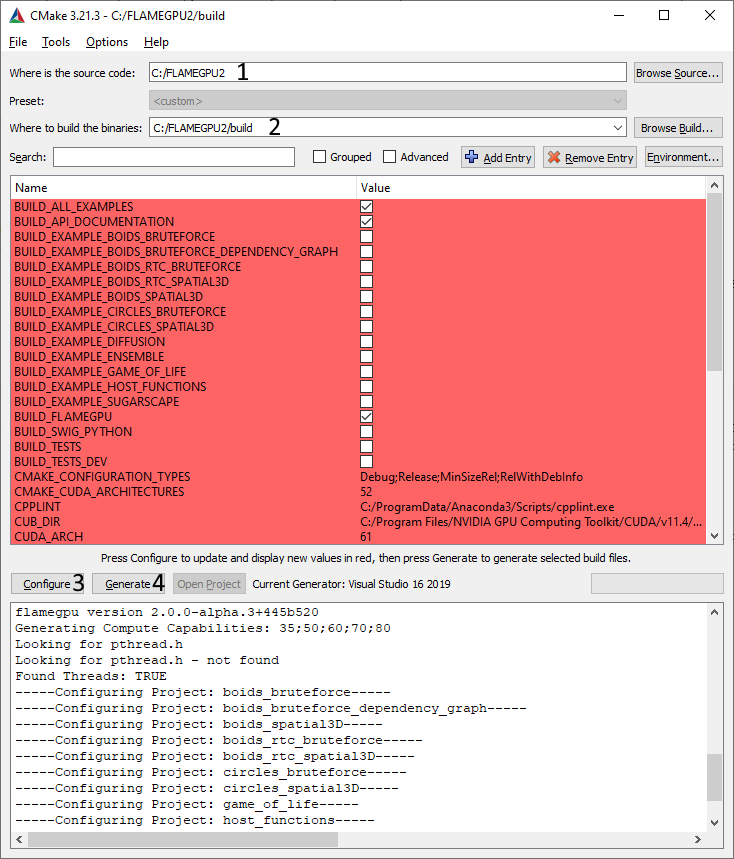
Specify the directory containing the FLAME GPU 2 source (Annotation #1). This should be the directory you cloned the git repository into.
Specify the directory to store FLAME GPU 2 build files (Annotation #2). This must not match the source directory FLAME GPU 2 does not currently support in-source builds. The
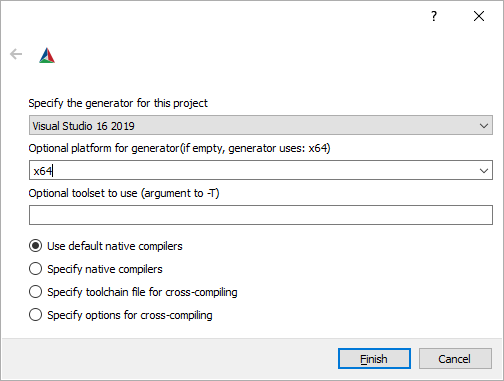
buildsubdirectory of the source directory is most commonly used. If this directory does not exist, CMake will offer to create it for you.Press the Configure button (Annotation #3) to load the configuration options. You will then be asked to select a “generator” (see the below image), you should select the latest version of visual studio you have and choose the
x64platform. It will then perform various checks to initialise the build configuration, such as detecting CUDA and testing the compiler is suitable.At this point, if you have multiple CUDA versions installed and don’t wish to use the newest, you can specify the desired version in the toolset box e.g.
cuda=12.0would select CUDA 12.0.
The central table should now be filled with options you can configure to adjust how FLAME GPU 2 is built. You can update these options, according to the FLAME GPU 2 README.md in the source directory as suggested options may vary between releases.
If you have changed any options, you should press the Configure button again (Annotation #3), as subsequent initialisation may need to be performed.
After the configuration options have been selected and applied, the project can be generated using the Generate button (Annotation #4).
If generation succeeds the Open Project button should now be available. Clicking this should open the project in Visual Studio so that you can build FLAME GPU 2. If you have multiple versions of Visual Studio installed, it may open with the wrong version. You can alternatively, locate the
.vcxprojand.slnfiles in the build directory you specified (Annotation #2), a project file is created for each sub-component and example, openingALL_BUILD.vcxprojwill open the full solution with all configured components.
Running Your Project
Once compiled, the executable will be placed into the bin/<config>/ directory within your build directory. Execute with --help for CLI argument information.
cd build
./bin/Release/example --help
cd build
"bin/Release/example" --help
Python 3
The Python 3 interface for FLAME GPU 2 is available via pre-compiled binary wheels for some platforms, or can be built from source via CMake.
Installation
Pre-built binary wheels are available for Windows and Linux on x86_64 platforms for:
Python
3.8to Python3.12Linux
x86_64withglibc >= 2.28CUDA
12.0+(Compute Capability>= 5.0)CUDA
13.0+(Compute Capability>= 7.5)
Windows
x86_64CUDA
12.4+(Compute Capability>= 5.0)CUDA
13.0+(Compute Capability>= 7.5)
With and without Visualisation support
If you do not meet these requirements, please see Building From Source.
Optionally create and activate a new python
venv, conda environment or similar to install the.whlin to:
# If using a python venv: python3 -m venv venv source venv/bin/activate/bash:: If using a python venv python -m venv venv call "venv/Scripts/activate.bat"
Either install
pyflamegpufrom the pyflamegpu wheelhouse, or from the latest GitHub Release.
If using the pyflamegpu wheelhouse, install via pip as described in the wheelhouse. E.g. to install the most recent non-visualisation wheel for CUDA >= 13.0
python3 -m pip install --extra-index-url https://whl.flamegpu.com/whl/cuda130/ pyflamegpupython -m pip install --extra-index-url https://whl.flamegpu.com/whl/cuda130/ pyflamegpuSee the pyflamegpu wheelhouse for available versions.
Or you can manually download and install the appropriate wheel from the latest GitHub Release. See the release notes of the specific release for details of which file corresponds to which release.
Once downloaded, the
.whlcan be installed into your python environment viapip:python3 -m pip install filename.whlpython -m pip install filename.whl
Building From Source
FLAME GPU 2 uses CMake with out-of-source builds. This is a 3 step process:
Create a build directory for an out of tree build
Configure CMake into the build directory, using the CMake CLI or GUI
Specify CMake configuration options such as the compute capabilities to target at this stage
Build compilation targets using the configured build system
To build the python bindings, the FLAMEGPU_BUILD_PYTHON CMake option must be set to ON, and the pyflamegpu target must be compiled. The generated python binary wheel can then be installed into your python environment of choice via pip
For example, to build and install python bindings into a new venv, for Compute Capability 6.0 GPUs in the Release configuration, using 8 threads:
# Create and activate your venv
python3 -m venv venv
source venv/bin/activate

# Build the python bindings, producing a .whl
mkdir -p build && cd build
cmake .. -DCMAKE_CUDA_ARCHITECTURES=75 -DFLAMEGPU_BUILD_PYTHON=ON -DCMAKE_BUILD_TYPE=Release
cmake --build . --target pyflamegpu -j 8

# Install the wheel via pip
python3 -m pip install lib/Release/python/venv/dist/*.whl
:: Create and activate your venv
python -m venv venv
call "venv/Scripts/activate.bat"

:: Build the python bindings, producing a .whl
mkdir build && cd build
cmake .. -G "Visual Studio 17 2022" -DCMAKE_CUDA_ARCHITECTURES=75 -DFLAMEGPU_BUILD_PYTHON=ON
cmake --build . --target pyflamegpu --config Release -j 8

:: Install the wheel via pip
python -m pip install lib/Release/python/venv/dist/*.whl
Creating a New Project
The simplest way to create a new project is to use the provide template repository on GitHub:
https://github.com/FLAMEGPU/FLAMEGPU2-python-example-template
You can either:
Use GitHubs’s
Use this templatefeature to create a copy of the template repository on your accountDownload a copy of the template repository as a zip via
Download zipClone the template repository via
git clone git@github.com:FLAMEGPU/FLAMEGPU2-python-example-template.git
Alternatively, as python models do not require a complex build system such as CMake simply creating a new python source file which includes import pyflamegpu would be sufficient.
Then edit the python file as desired.
Running your project
To run your python-based model:
Activate the python environment which has
pyflamegpuinstalled
# Assuming a python venv was created in the current directory, named venv
source venv/bin/bash/activate
:: Assuming a python venv was created in the current directory, named venv
call "venv/Scripts/activate.bat"
Run your models
.pyfile using your python 3 interpreter
# Assuming the main python file for your model is called model.py
# Use --help for Usage instructions
python3 model.py --help
:: Assuming the main python file for your model is called model.py
:: Use --help for Usage instructions
python model.py --help